Thursday, January 12, 2012

Left caliper (Cont.)...

The "patin" is ready to be installed; here with the rods in place and the ratchet mechanism. Everything is greased up and ready to go.


I've used some mag wheel cleaner and multiple wire brushes to get the caliper in decent shape.


These will be painted gloss black.


The ratchet lock before cleaning. 


The ratchet self-adjusting mechanism. The part on the right has no notch, so it is a right-hand turn (Clockwise). On the other side there are two notches which are telling you that it is the left-hand turn (counterclockwise) parts. 


Wednesday, January 11, 2012

Left caliper...

 I have removed the left caliper yesterday. It was a nightmare!
One fitting was so tight that I had to remove the rack to work on it (Destroyed by the way!). I will have to make new piping later on.
The caliper was a solid piece of metal; everything is seized. I broke parts and some I could not remove.


Some broken parts...


It took me a long time with a torch, WD40 and compressed air to remove the pistons.
I've honed the cylinders and polished the pistons.


 The "patin" is finished.


Cleaned up well.


Working on the piston rods.


Tuesday, January 10, 2012

Caliper re-assembly...

 Putting everything back together...
The tolerance was so tight that the piston had a hard time to fit even without the O rings. I've honed the cylinders until the pistons could enter and slide nicely.


Polished the pistons also.


I've use 2-222 O rings; nice fit.


One clip on the rods was missing and the other one was too rusty. I've used a 1.2mm steel wire that works very nicely. 


I've used grease to stop rust and protect the pistons against further rust or leaks. I've also put grease down the shaft; the suction and the clips will hold the rods nicely in place.


Cleaned up the caliper, prep the parts and painted some.


I've installed the parking brake lever, ratchet assembly and block with the shims and rails.


Next is the spring and index going down to the ratchet.


Before installing the spring I've set the ratchet according to the shop manual (I had to switch to the French manual; the English version was tough to understand for me), then I made sure that the ratchet was working properly. I've backed the block off and install the spring.


Bottom view.


Top views.


Top view with the pads temporarily installed. 
Note: The screws that hold the pads in place have a thinner thread (.75) that the regular 5mm screws widely used on the DS.


Monday, January 9, 2012

Calipers...

I have started with the right caliper.


The bleed line and spring for the parking brake mechanism.


I had to use heat to remove the screw (Which broke)


Used a Dremel tool top make a new slot on the screw; finally loosened up with some heat and WD40


One spring that recalls the piston block was missing; probably broke at some point. I've tried to find a replacement spring and pin when I bought the car but could not find a spare part back then. After 1958 this feature disappeared; I probably will not put this back on. 


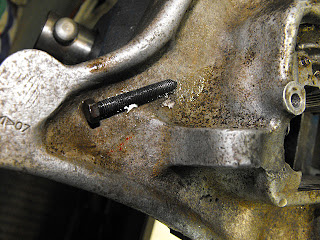
This is one of the 2 screws that holds the guide for the pistons block. I had to use heat everywhere to  loosen everything and avoid braking anything.


I did not follow the sequence mentioned in the shop manual due to some stuck parts.


This part pushes on the block when the parking brakes are applied.


The biggest nightmare was to remove these. The plates are the shims between the caliper frame and the pistons block. The other parts are the guides. The block is not going anywhere without removing these. I've used a wise-grip, heat, WD40 and a lot of patience to remove these (Probably spent an hour on that).


The ratchet and block are finally free.


These go in the pistons and push on against the caliper frame.


The block with frozen pistons.


The cavity where the parking brake mechanism are.


I had to use heat and compressed air to remove the pistons; another tough job.


The piston exceptionally in good shape considering the age of the car.


Ready to clean the parts and rebuild.


Thursday, January 5, 2012

Soda blasting the rims.

My rims were blasted yesterday by Connecticut Soda Blasting. Great job!


They look good and ready to be primed and painted.


My front calipers are getting really sticky especially with the parking brake mechanism. I'll put them apart today.


Wednesday, January 4, 2012

Starting on the rims...

 I'm working on the rims now. We have matched the color with a Talbot/Matra color.
The rims are going to be sand blasted today.


Interesting: The rims were made in April 1956.